http://sketchupdate.blogspot.kr/
Wednesday, May 22, 2013 9:35 AM
Less than a year after joining the Trimble family, it’s our pleasure to announce the arrival of SketchUp 2013. For this release, we focused on two things: building an ecosystem that makes it easier for millions of SketchUp modelers to find and use the plugins and extensions they need, and continuing to turbocharge SketchUp Pro’s documentation and presentation features (in the form of LayOut). We think you’ll be really excited about both—we certainly are.
Extension Warehouse: A smarter approach to SketchUp plugins
 |
| Can SketchUp do X, Y, or Z? Extension Warehouse is the place to find out. |
Over the years, our beloved plugin developers—the folks who use our Ruby scripting tools to build add-ons for SketchUp—have created some truly amazing features. Historically, these extensions have been crazy useful, laughably affordable, and (for the most part) incredibly difficult to find. No more.
For 2013, we built a repository of extensions—an Extension Warehouse, in our parlance—that provides a one-stop shop for anyone looking to customize their copy of SketchUp. This one new feature is actually dozens (eventually hundreds) of new features, all ready and waiting for you to discover. Using the Extension Warehouse to find, install and update plugins is a simple operation. And best of all, it all happens right inside SketchUp.
 |
| By far the best way to get to the Extension Warehouse is by clicking its icon in SketchUp 2013's main toolbar. |
When you visit the Extension Warehouse, you’ll notice it’s every bit a modern app store: most-popular lists, user reviews, download statistics, introductory videos and more. Clicking a plugin’s “Install” button takes care of just about everything that used to make Ruby scripts so cumbersome to use. No more digging around for your plugins directory. No more unpacking files and folders into precise locations in your file system. No more wondering why this can’t all be easier. Because now it is.
LayOut in SketchUp Pro 2013: More tools for turning your models into drawings
We’ve heard that you’d like to take your SketchUp models farther into the documentation part of your workflow. For that, we’re continuing to turn LayOut in SketchUp Pro into a full-fledged tool for creating scaled, annotated and dimensioned drawings from your models. In this version, we’ve added hatching and other pattern fills, speedier vector rendering, better zoom, more useful callouts and other improvements we think you’ll love.
The complete list of details about what’s new in SketchUp Pro 2013 is too long to include in this blog post. We’ve written another one just for that purpose: SketchUp Pro 2013: A closer look at LayOut.
SketchUp Make: A new brand for an old favorite
We decided that the free version of SketchUp needed a name and a brand of its own. Now the word “SketchUp” refers to a product family of which there are two members: SketchUp Pro and SketchUp Make. The latter is still free, international, and aimed squarely at every treehouse builder, 3D printing wizard, and pinewood derby all-star in the universe. It’s a reflection of our commitment to our “3D for Everyone” mantra, and I’m super proud to say it’s here to stay. Read all about it here: re(Introducing) SketchUp Make.
We know there’s been some confusion about choosing the right version of SketchUp in the past, so we want to be absolutely clear about this going forward. If you’re working on a personal project, SketchUp Make is for you. If you’re doing professional or commercial work, SketchUp Pro is for you. You’ll notice we’ve clarified that SketchUp Make is “not licensed for commercial work.” We think SketchUp Pro can help our professional users do amazing things, and with their support, we have every intention of making it an even better tool for modeling, documentation, and communication. And if you need 3D modeling in the classroom, in a makerspace, or in your garage, this change doesn’t affect you at all: SketchUp Make is free and here to stay.
Upgrade and Support, all rolled into one
Starting today, we’re introducing a simplified Upgrade and Support program for SketchUp Pro. It goes like this: When you buy a new license for SketchUp Pro 2013, you’re also buying a year’s worth of included upgrades (major and minor), email tech support, and phone support for installation and licensing issues. If you already have a SketchUp Pro license that you need to upgrade to SketchUp Pro 2013, you can purchase the same Upgrade and Support program separately. We think it’s a good deal, and we think you will, too. Find out more about it here: Upgrading to SketchUp Pro 2013.
Posted by John Bacus, SketchUp Team
(re)Introducing SketchUp Make
9:34 AM
In 2006, just a few weeks after we closed our original acquisition by Google, we introduced a slimmed-down new version of SketchUp that allowed people to quickly and easily build 3D models of the buildings that mattered to them for representation in Earth. one of the biggest features we added was actually something we took away… the price tag. This new version of SketchUp cost nothing to use—and because SketchUp is SketchUp—anyone could learn how to do so in almost no time at all.
As most folks probably now know, the free version of SketchUp has been a huge success. In the past six years or so, its user base has grown into the millions and spread around the world. Today more than 30 million people a year use SketchUp in a dozen different languages, at a rate of almost 40 starts per second. Read that again if you need minute for it to sink in… SketchUp is used almost a billion times a year. And still that number is growing.
While there are certainly communities of folks who still use SketchUp as a “geo-modeling” tool for Google Earth, the reality is that that this kind of use has only ever represented a small subset of all the things people are actually doing with it.
We found that SketchUp has been used to plan structures at Burning Man. It has also been used to launch ocean cleaning drones. Not only has it become a tool of choice for 3D printing enthusiasts, it’s been used to design the printers themselves, helping to kick off a broader revolution in personal manufacturing. on top of it all, SketchUp can be used by kids to design the best pinewood derby racers ever. Truly we’re seeing “3D for everyone” playing out at a grand scale.
 |
| SketchUp Make: Used by people who make things (sometimes even to make things that make things) |
As it turns out, there’s now a name for this diversely creative and inventive group of folks who have been using SketchUp for years. We call them “Makers,” a term coined by Dale Dougherty and his gang at Make:. We’ve been a part of Dale’s movement since the beginning, and we’re in it for the long run. And it is in honor of the Maker movement that we’re re-launching our free 3D design tool under the new name “SketchUp Make.”
But really, there isn’t much else changing here—SketchUp Make is still free for non-commercial use, still powerful and still under active development. We’ve added a batch of new features to the 2013 release of SketchUp Make (check out our new STL import|export extension, for example) and we’re looking forward to developing and supporting it well into the future. Let’s go make stuff together!
Posted by John Bacus, SketchUp Team
Have questions about SketchUp Make? We'll be listening here and on this thread in our help forum.
SketchUp Pro 2013: A closer look at LayOut
9:33 AM
LayOut in SketchUp Pro has always existed to help you quickly and easily turn SketchUp models into compelling, communicative drawings. When we first released LayOut several years ago, its features put it firmly in the “presentation drawings” category of tools; it was equal parts layout, illustration, and slide software. Our users liked it, but they wanted it to do more—they wanted it to replace their bloated, complicated CAD systems, too. The live link between SketchUp models and LayOut model viewports has always been perfect for developing construction drawings that can evolve along with your designs.
A couple of versions ago, we decided to fully commit to making LayOut into the application that so many of you have been asking for. We added dimensions, vector rendering, and the ability to snap to points in your model viewports. We added DWG and DXF export, and configurable dashed lines. We made LayOut even faster, made it easier to move elements around precisely, and made lines editable—our Line tool may be the most intuitive vector drawing instrument around. Some of our users began to use LayOut to do complete sets of construction drawings.
For SketchUp Pro 2013, the improvements we made fall into three categories: a big, new feature, annotation refinements, and usability upgrades that make LayOut faster, smoother and even more pleasurable to use. Let’s take a look at these in order:
Pattern Fill: Hatching for materials, poché and other applications
Glance at LayOut’s updated Shape Style panel and you’ll notice a major addition: Pattern Fill. In response to our pro users’ (vehement) requests for the ability to add areas of hatching to their plans, sections and elevations, we built a feature that does that—and more. Simply building a Hatch tool with a limited library of symbols would have satisfied the request, but it would have been a single-purpose answer to the problem.
 |
| This drawing is 100% LayOut in SketchUp Pro 2013. Notice the dot screen patterns used to indicate the ground cover and to poché the walls. |
Patterns in LayOut are simple raster images—usually PNGs—that can be any color, and can include an alpha channel for incorporating transparency. Most of the patterns we’ve included are single-colored lines with transparent backgrounds. This allows you to use any background color; just pick one from the Fill color well in the Shape Style panel. It’s a pretty flexible system that allows for an infinite number of combinations.
 |
| Almost all of the patterns we included in LayOut have transparent backgrounds. To add a solid color behind a patterned area, just click the Fill button in the Shape Style panel. |
The new Pattern Fill panel acts as a browser, but it also provides two other important pieces of functionality: Rotate and Scale. These are pretty self-explanatory, but they mean you can orient and size any pattern to whatever is appropriate for your drawing.
LayOut in SketchUp Pro 2013 ships with over a hundred example patterns, but adding your own tileable images (or ones you find online) is dead easy. You can create a pattern tile in any other graphics program. We used a combination of LayOut and Photoshop to create ours. Making patterns that tile seamlessly can be a little tricky, but we’ll be posting a tutorial in the next few weeks.
 |
| A sampler of patterns in the new LayOut. You can also add patterns you make yourself or find elsewhere. |
Patterns are stored in folders on your system, just like materials, components, styles and plugins are in SketchUp. We organized the ones we made for this release into four main categories:
Material Symbols represent common graphic notations for construction materials; they’re what most people mean when they refer to “hatches”. We built two dozen of the most common ones for this version, including old favorites like Steel, Cast-in-place Concrete, and my personal favorite, Earth Compacted Fill.
Geometric Tiles include rectangles, circles, hexagons and other shapes, arranged in common patterns like running bond, herringbone and checkerboard. We imagine that these can be used to represent anything from brick, to paving, to kitchen and bathroom tile, but of course you can also use them more abstractly if you like.
Site Patterns is a category we created to include the kinds of things you might use in a site drawing: Trees arranged into rows, in plan and in elevation. Parking spaces, both at 90 and 60 degree angles. And, as a bit of a joke, something Aidan calls “Mown Lawn,” in four attractive shades of green.
Tonal Patterns are things like dot screens, parallel lines, and sketchy edges. If you’re old enough to remember the beautiful drawings architects and illustrators were able to make with Zip-A-Tone and other, similar products, you can imagine the potential for these. Tonal patterns work alongside linework in drawings in ways that fields of solid color can’t. Your pochéd sections cuts will never look the same.
Better annotations make better drawings
LayOut’s Label tool lets you quickly and easily create a note with a leader line that automatically sticks to whatever it’s pointing to. It’s a simple concept, but there were a few things we did to make ours work a whole lot better:
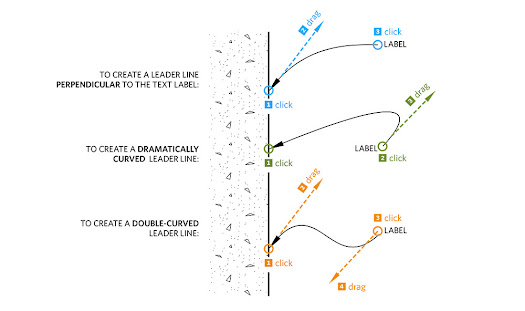
Curved Leader Lines: It was recently pointed out to me that the reason architects use curved callouts is so that they can be easily differentiated from the straight linework in the rest of their drawings. That makes a ton of sense, so we set about making it easier to create curved leader lines in LayOut. The old way involved no fewer than five clicks. The new way takes only two. If you want the line to curve, just click-drag when you’re creating it.
Improved Arrowheads: Most of the time, your leader lines terminate in an arrowhead. And most of the time, that arrowhead is a solid, black triangle. And in previous versions of LayOut, the only black arrowhead looked like it had eaten too many pastries. By astoundingly popular demand, we’ve added a slimmer, trimmer option, available in classic black and more discrete white. We also improved the alignment of arrowheads to make them look better when their leader lines are angled or curved.
Dashes in Dimensions: In the new version of LayOut, you have the option to add a dash to your non-metric dimensions. The difference between 8’ 6” and 8’ - 6” on a small printout with tiny type is anything but trivial.
Usability Improvements: Faster, smoother, and more efficient
There’s a lot to be said for making software more usable. This is less about features and more about tweaking, fixing and otherwise improving little things that add up to making LayOut a better application:
Copy Array lets you use keyboard modifiers to easily make multiple copies of entities, all at once, just like you can in SketchUp. Since our developers coded this feature into our test versions a few months ago, I’ve used it almost every day.
Speedier Vector Rendering means significantly less time waiting for LayOut to vector-render the contents of a model viewport. You should consider using vector rendering whenever you’re dealing with crisp linework in a document that will be printed or exported at a large physical size.
Better Zoom is probably the thing you’ll notice first. We increased LayOut’s maximum zoom level by a factor of ten, from 1000% to 10,000%. When you’ve got a lot on your page, and things are small and close together, being able to zoom in farther is a godsend. You’ll see.
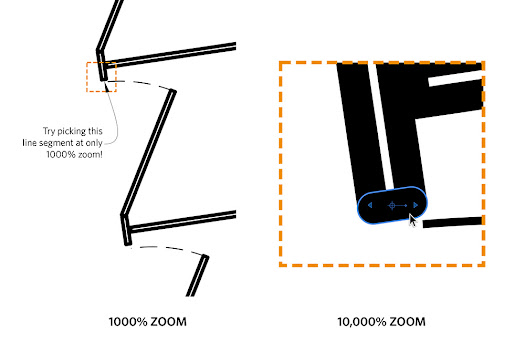 |
| We increased LayOut's maximum zoom by a factor of 10. Now you can zoom in far enough to select and edit the smallest entities on your page. |
Numbered Pages in the Pages Panel is a handy tweak that makes it easier to print or export specific pages in your LayOut document. No more counting down from the top of your Pages panel to figure out it’s page 43 that you want to export to PDF.
Faster Screen Redraw should make LayOut feel snappier, especially as your document gets more complex. Every time you zoom, pan or move an entity on the page, the tiny elves in your computer have to re-draw the picture on your screen. For 2013, our engineers optimized the code that controls how fast this happens.
Posted by Sandra Winstead, LayOut Product Manager
Upgrading to SketchUp Pro 2013
9:32 AM
We’re super excited about the launch of SketchUp Pro 2013. We listened very carefully to user requests which led to some amazing new changes, such as hatch patterns in LayOut and a new Extension Warehouse. However, there’s another feature that we’re excited to announce today, but it’s one that you won’t find in the toolbar.
Going forward, purchasing major version upgrades for SketchUp Pro will no longer be an unpredictable process. Now, you can get ahead of the game and pre-pay for major versions with our yearly upgrade, maintenance, and support program for $95 ($150 for network licenses). So with your license upgrade (or new license purchase), you’re also purchasing one year of coverage for future upgrades to SketchUp Pro. If you’re on the program and we release a new version of SketchUp Pro in nine months, your license gets upgraded at no additional charge. Pre-paying for upgrades in this way has been a popular feature request from Pro customers who want to have a predictable budget and make it easier for their company to be on the latest version.
But wait, there’s more! With this program, customers are also entitled to one year of friendly email technical support from our crack team of experts and—for the first time in six years—phone support for installing and licensing issues. If you’d like to get the nitty gritty details about our support going forward, check out our new Knowledge Center article for more information.
So, if you’re an existing SketchUp Pro customer and you’d like to upgrade to SketchUp Pro 2013, head over to our online store to keep up-to-date with SketchUp Pro. A few other things you should know about upgrading:
- You can upgrade any active commercial license from SketchUp Pro 8, 7, 6... you get the gist.
- You’ll need your most recent license info: serial number, registered user and company name. If you can’t find that stuff, retrieve it here.
- If you purchased your license through one of our authorized resellers, please contact that reseller directly for their upgrade terms.
- After you upgrade, we’ll email you license info and a link to download SketchUp Pro 2013.
- Non-expired EDU licenses may upgrade to SketchUp Pro 2013 for free; you’ll need to contact your educational reseller to upgrade.
- SketchUp Pro licenses (still) never expire, so if you decide to skip an upgrade one year, you simply keep using your current version of SketchUp Pro.
If you have questions or comments about the upgrade, maintenance, and support program, please check out this handy Q&A. We’ve also started a Help Forum discussion where SketchUppers will be happy to lend a hand.
Posted by Tommy Acierno on behalf of the SketchUp team
Pssssst. There’s something new at SketchUp.com
Tuesday, May 21, 2013 2:00 AM
If you've visited SketchUp.com today, you might notice some big changes: a new release, a new website, new branding, and updated pricing and policies. With all that’s new, we decided to test everything before we officially announce anything. We’re currently pulling the knobs, throwing the switches and generally making sure everything works properly.
If you just can’t wait to get the whole scoop, here’s a teaser: SketchUp 2013 (yes, we skipped a couple of thousand version numbers) is focused on the twin themes of extensibility and 2D documentation. This release is all about plugins in SketchUp, and LayOut in SketchUp Pro. We’ll get into the details soon, but there’s an even more exciting way you can learn more: download the new version and have a look around. It’s available right now on SketchUp.com.
Stay tuned for more news soon, and happy exploring...
Posted by John Bacus, SketchUp Product Management Director
Making our space at Maker Faire Bay Area
Friday, May 10, 2013 3:15 PM
SketchUp Maker Faire checklist:
- SketchUp design
- Engineering toolbox plugin
- Cutlist plugin
- Lumber cutlist
- Miter saw
- 18-bolt cordless drill
- Gorilla glue
- Safety glasses
- Band-aids
Through our years attending Maker Faire Bay Area we’ve realized this: we generally spend less time talking about SketchUp and more time using it. For us, Maker Faire is usually more of a workshop than a trade show.
Recognizing that, we wanted to do something a bit different for Maker Faire Bay Area next weekend in San Mateo, CA. For starters, instead of setting up a booth to tell people about SketchUp, we decided it would be more fun to create a space where we could work with people on SketchUp projects. And since we designed it ourselves, we decided to make it ourselves too.
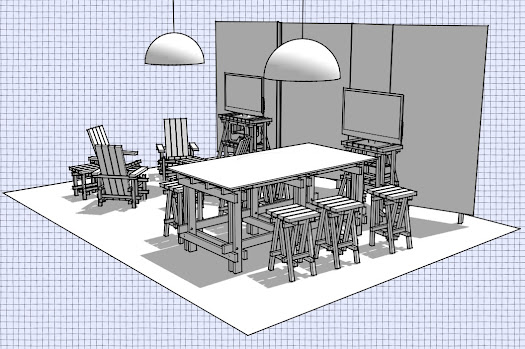 |
| Our Maker Faire 'designer-space' concept: excuse our sawdust |
We thought designing and building our own furniture was a good approach since we’re participating in Maker Faire’s Model Makerspace (in the Sequoia building). This is a prototype makerspace that pulls together the requisite tools makers need to make ideas real: electronics, laser cutters, CNC routers, 3D printers, science kits, and of course, 3D modeling. The idea is to teach folks how to set up their own makerspaces, and we’re excited to be a part of that effort.
We like to say that nothing great was ever made that didn’t start with a great drawing. We’ll be working on drawings of our own project over the weekend, but we’d rather help you take your idea to the next level. Do you have a SketchUp project or even a rough sketch of something you want to create? Send a model or an image of your project to sketchupblog@gmail.com, and we’ll hook you up with free admission to Maker Faire Bay Area*, and then help you work on your model.
 |
| We'll be rolling up our sleeves on modeling projects all weekend in the Model Makerspace. |
Of course, there are plenty of people who visit us at Maker Faire who have never used SketchUp before. At past Maker Faires, we noticed we were spending a lot of time teaching folks SketchUp one at a time, and A LOT of folks want to learn. So we had another idea: why not to teach everybody at once? So, in addition to our design studio in the Model Makerspace, we’re also hosting a Mass 3D Modeling Teach-in on the Maker Faire Center Stage at 7pm on Saturday. Come one, come all: learn, draw, then build something rad.
Posted by Mark Harrison on behalf of the SketchUp Team
*If you live in the Bay Area, send us a workable project. We’ll send you a discount code to get Maker Faire tickets online (on a first-come, first-serve basis -- limited availability).
Permalink | Links to this post | 3 commentsNew book: Rendering in SketchUp
Friday, April 12, 2013 12:32 PM
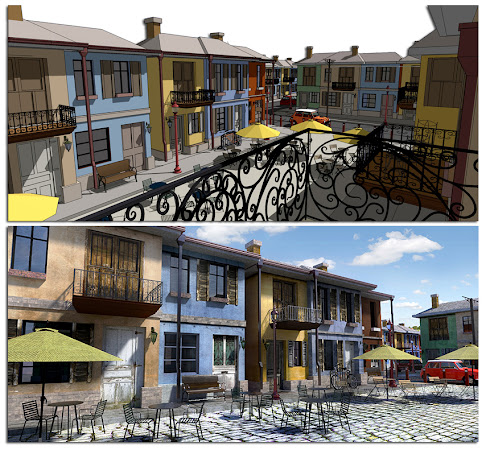
Several years after publishing his first book, SketchUp expert Daniel Tal has released a new title, Rendering in SketchUp, tackling the rather large topic of, well... rendering in SketchUp.
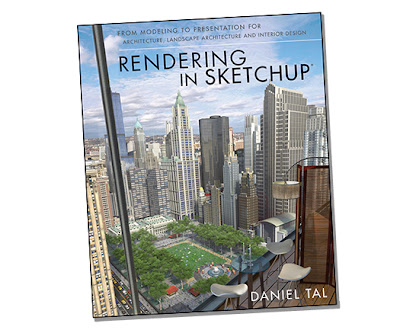 |
| "Rendering in SketchUp: From Modeling to Presentation for Architecture, Landscape Architecture, and Interior Design." Say that three times fast. |
Rendering In SketchUp has a goal of being both a starter guide and a handy reference manual on rendering. At just over 640 pages, the book is accompanied by a website and free, downloadable ‘companion chapters.’ The full package comes in at about eight hundred pages.
Who in their right mind would read so many pages (let alone write that much)? Well, rendering is a big deal to many SketchUp users, so it’s not surprising to find that some daring folks have already read through Daniel’s book in its entirety -- you can see the initial reviews on Amazon.
What these readers found was an easy-to-use, beginner manual that also serves as a detailed reference guide for rendering. As one reviewer stated, you can jump in and out of the book as needed. It’s a true reference manual on how to turn SketchUp images into beautiful renderings, so it makes sense that the book is full of beautiful images, 650 of them in fact.
Across textures, lighting methods, post production tips, specific render settings and broad concepts, Daniel's book covers all aspects of the rendering process. It even has a nifty chapter on simple but advanced detailing (don’t use that texture for the roof shingles, model them!).
Rendering is a bulky topic, so a comprehensive guide like this one could be pretty overwhelming. Daniel, however, does a wonderful job of organizing his book, taking you through each step of the process in a logical fashion. Place textures, add detail, set lighting, apply rendering values to surfaces, render, and then post process the results.
Does the book cover all of the rendering applications for SketchUp floating around the universe? If it did, the book would probably jump from weighing 2.8 pounds to 20. (As it is, you might find it handy to check out the Kindle edition).
Instead, Rendering in SketchUp provides a universal approach that works with most (if not all) rendering programs. The book focuses on integrated rendering programs: rendering software that works within SketchUp. Daniel also provides provides specific chapters, overviews and settings for Shaderlight and Twilight Rendering software with a detailed inclusion of SU Podium. With this approach, you can apply Daniel’s methods across a healthy spread of rendering choices.
So this book has it all, right? Well, rendering is a huge topic. Daniel is one of many experts with his own approach and opinion. But if the task of turning SketchUp models into high quality images has always intimidated you, Rendering In SketchUp is not only a great starting point, but also a smart path to mastery.
Learn more about Daniel’s universal approach to rendering in this in-depth webinar.
Posted by Chris Dizon, SketchUp Sales
SketchUp for crime scene reconstruction
Friday, February 15, 2013 2:28 PM
We’re never surprised to hear that SketchUp is being used in ways we didn’t expect, but we were particularly impressed when we came across this article about SketchUp’s knack for reconstructing crime scenes. We wanted to learn a bit more about how 3D plays into crime scene reconstruction (and yes, some of us are Dexter fan boys), so we tracked down Detective Albert Schade, the article’s co-author and the mind behind Crime Scene Interactive, a website that details workflows for modeling crime scenes in 3D.
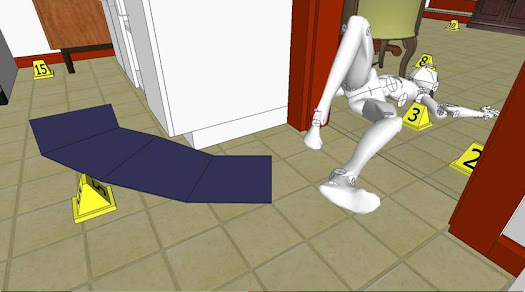 |
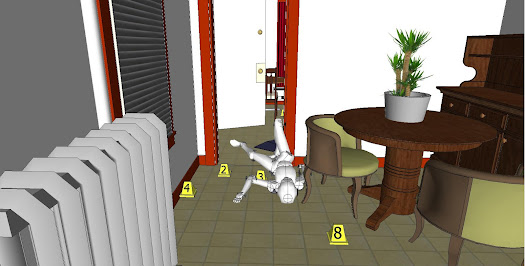
| A SketchUp model used as the basis for crime scene reconstruction |
How long have you worked with 3D modeling software?
I’ve been 3D modeling since the mid 90’s; I got my feet wet with Animation Master and Milkshape: those really broadened my use of computer generated animation and modeling. Since then I’ve toyed with 3D Studio Max, Maya, Blender and SketchUp.
So what is "Crime Scene Interactive?" Who is it for?
Crime Scene Interactive has gotten a lot of attention since the publication of our article in the Association of Crime Scene Reconstruction Journal. Crime Scene Interactive is a workflow that allows you to make interactive courtroom exhibits through the use of SketchUp, Blender, Gimp or Photoshop, Ultimate Unwrap3d and the Unity 3D game engine.
SketchUp, in particular, is a huge part of that workflow thanks to its ease of use and the ability to quickly model in real world measurements. SketchUp also happens to be very expandable with the ability to add features via Ruby and its nice assortment of import/export options.
What role does 3D modeling play in your detective work?
I’m a Detective in the Forensic Services Unit for the Berks County District Attorney’s Office. I investigate homicides, serious bodily injury cases and fatal crashes. I also instruct police officers in fingerprint comparison, blood spatter, evidence processing, and 3D crime scene creation. 3D modeling is a great way to make exhibits for all of these disciplines.
In law enforcement, we face several hurdles when bringing cases to court. During evidence collection and processing we obtain a large amount of information. When we testify in trial, we need to relate that information to juries -- groups of people with very diverse educational backgrounds -- in a very short period of time. Demonstrative exhibits help visually display that information. So 3D models and walkthroughs are incredibly useful for taking the vast data we’ve collected at a crime scene and relaying it in court so that a jury panel can make an informed decision.
3D is also important for investigations. Most people don’t realize that police departments spend a lot of resources not only proving what did happen, but what didn’t happen. In pursuit of the truth, rapid availability of reconstruction information helps us decipher witness or suspect statements. We can focus on the right people and not waste time on bad leads.
How did you first come across SketchUp?
I first used SketchUp for personal projects. I like woodworking, so I used SketchUp with the Cutlist plugin to help organize my project and develop a shopping list. Learning how engineers and various other artists and professionals around the world were using SketchUp is what led me to start using it for crime scene work.
Now, SketchUp fits perfectly in my workflow. With a large caseload, I need to keep investigations moving. With SketchUp, I can mock crime scenes very quickly, and then communicate the spatial relationship of items in the scene to other investigators in a clean, concise fashion. From there, we can start the process of testing theories and corroborating witness accounts to physical evidence.
 |
| Small apartments often make photography and camera views difficult to share. SketchUp's X-Ray mode provides a good overview of a room and makes it easier to navigate the 3D space. |
Are there specific tools in SketchUp that are particularly helpful for your work?
LayOut is a great tool for turning sections of scenes into illustrated visuals for a presentation slide. SketchUp Pro’s reporting function is also very useful, because I often have to provide defense attorneys with data that shows my scene model is accurate. The report option lays out this data in a spreadsheet, saving me a lot of time.
The ability to export models to .FBX format is also important because I currently use the Unity game engine to animate interactive walkthroughs of a scene. The DXF import option also helps because some of our measuring equipment saves to DXF; that import ability makes it easy to load control points directly into SketchUp Pro.
It sounds like you use several 3D tools in cooperation with SketchUp; what else is in the quiver?
I use Blender to make human models animate and any organic models that would otherwise be difficult to create in SketchUp. HemoSpat is a blood spatter analysis suite that allows me to create a 3D model of a bloodletting event’s area of origin. It can then be imported into SketchUp for placement in the crime scene model.
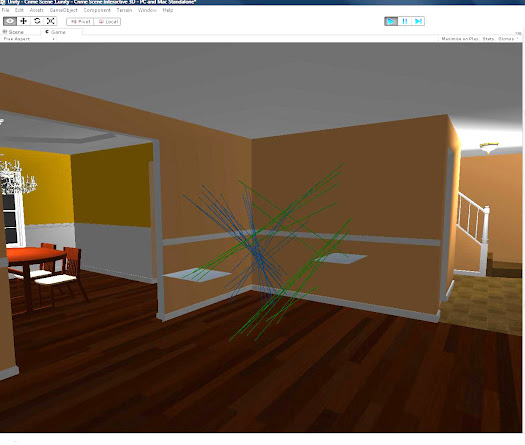 |
| A SketchUp model (running in Unity 3D) with the blood spatter model accurately position. The lines show the trajectory of the blood, and where they intersect shows the area of origin in 3D space. |
I also use Unity, a game engine that brings crime scenes to life in an interactive animation. This lets you walk through the crime scene in a courtroom just like a video game. You can interact with items of evidence, and display images from the crime scene in relation to the model.
Posted by Mark Harrison, SketchUp team
SketchUp Pro Case Study: Environmental Air Systems
Tuesday, February 5, 2013 6:49 PM
Environmental Air Systems (EAS) is a full service mechanical contractor based in North Carolina specializing in mechanical systems for health care, pharmaceutical, and data centers. EAS also has unique capabilities for Off-Site Construction (OSC), which allows for the manufacture of a wide range of products from mechanical skids and air handling units, to full central utility plants and large scale modular data centers.
With SketchUp Pro, Environmental Air Systems has been able to improve communication with their clients as well as increase their Off-Site Construction productivity. Carroll Shephard is the Production Design Coordinator for EAS, and also one of their SketchUp champions. He spoke with us about how EAS uses SketchUp.
SketchUp at EAS
Back in 2007, EAS was working on two data center projects. In an effort to create a more accurate and visual as-built of the product, we switched to SketchUp. We provided our client with an AutoCAD version along with the SketchUp as-built model. The client really liked that we gave them something more visually rich through SketchUp. Since then, we have transitioned all of our production drawings to SketchUp. Now, we are adding SketchUp to more processes than ever.
With SketchUp, we don’t spend a lot of time learning the software, and because it’s so intuitive, we’ve reached a point where we can rapidly turn detailed models into coordinated production drawings for our manufacturing facilities. Then, we generate material lists with an extension plugin.
 |
| The use of 3rd party plugins, like Space Design by RenderPlus, allows for custom report generation directly out of SketchUp |
SketchUp has changed the way we design as it enables us to transition from 2D to 3D. The advantage of working in 3D is that our product is “virtually built” before materials are ever ordered. Previously, we coordinated parts by calculating the clearances needed using a calculator or spreadsheet. Now, all the drawings (previously made using AutoCAD) are produced in SketchUp. From there, we have been able to coordinate our products using Navisworks (and we’re now experimenting with Tekla BIMSight).
SketchUp Pro & Client Communication
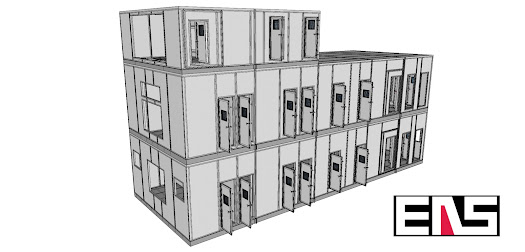
While communicating with clients, SketchUp most often plays the role of a visual aid. For example, we recently worked on the preliminary design of a pipe rack system to be installed in a pharmaceutical facility. With SketchUp, we were able to model the pipe rack exactly as it would be installed (a retrofit situation). The SketchUp model helped the marketing group clearly communicate the scope of work and make sure that our design was meeting or exceeding client expectations.
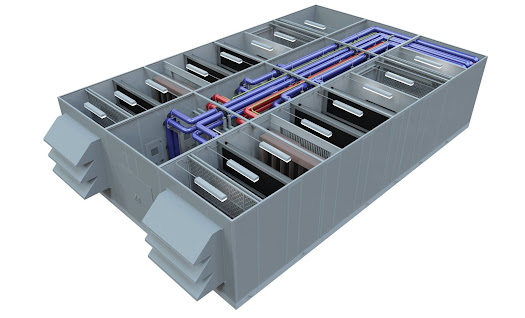 |
| Rendered models help clients visualize how projects will look after completion |
We also generate concept renderings for potential clients. These allow our clients to see what their project will look like once completed. So to a real extent, we also use SketchUp as both a sales and design-build tool: it enables us to show potential clients our solution for their specific application and then it helps us produce accurate, detailed drawings quickly. Both of these advantages enable us to be more successful and it has been a driving force on many projects.
Guest authored by Carroll Shephard, Environmental Air Systems, LLC
STL's for 3D printing: in-and-out of SketchUp in two clicks
Friday, January 18, 2013 10:15 AM
MakerBot CEO Bre Prettis is a pretty cool customer, so I took it as a good sign when he yelped with excitement at SketchUp's 3D Basecamp 2012 after the announcement of SketchUp’s STL plugin.
Reading and writing STL files from SketchUp is something that users have been able to do for a while with the help of two separate ruby plugins. But as 3D printing has continued to boom, we’ve been thinking of ways to make this file exchange easier. So we emailed the original plugin developers, Jim Foltz, Nathan Bromham, and Konrad Shroeder, and asked if they would be interested in letting us combine their tools into a single open source plugin. All three responded with a resounding “yes!”
But, what’s the big deal with STL, anyway? There are many who believe, and so do I, that we're on the verge of a new age in fabrication and prototyping. You can now take designs and make them a reality in the comfort of your own creative space. We're just scratching the surface with this technology that brings digital back to analog, and for the moment, the STL file format is a lynchpin between 3D models and print-ready objects.
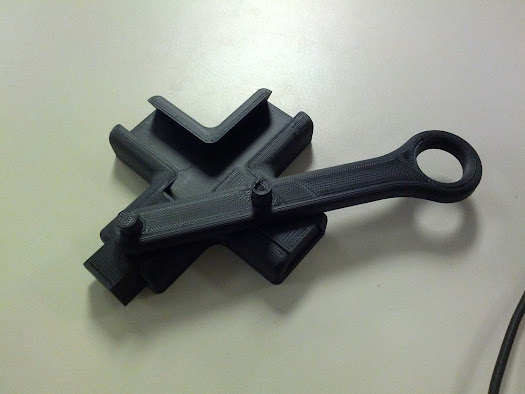 |
| Our very own do-nothing machine; you'd be surprised how addictive this is |
At the SketchUp office, we’ve been experimenting with MakerBot Replicators for a while now. Our experiences range from high-five successes to epic failures. one tale that sticks out in my mind, however, is when we helped our friend Omar save $120. Omar owns a vacuum cleaner that had a small, uniquely shaped plastic piece that broke. To repair the piece, he had to replace a whole section of the vacuum (hence, the $120 price tag). He sent me an email and asked if we could try replacing the piece with our 3d printer. I told him to stop by my desk with the broken piece and pair of digital calipers. After about an hour of SketchUp modeling, we had what looked like a perfect replacement. I exported the model to STL, opened the file with Replicator G, exported the file to Alpha (we’ve named our three Replicators Alpha, Bravo, and Charlie) and let the MakerBot do the rest. To my pleasant surprise, the piece worked perfectly.
| When it comes to vacuum cleaner maintenance, it turns out that cheap plastic is great for replacing cheap plastic. |
While you can bring your custom SketchUp designs to life with the STL plugin and a 3D printer, you can also import pre-made content to modify prior to print. For example, my oldest son wanted to play with an R2D2 last weekend. I found one on MakerBot's Thingiverse database and imported all of the STL files into SketchUp to rearrange the pieces to fit on a single build platform (you can download the model here). I exported to STL and about 7 hours later, I had a complete R2D2. Pro Tip: Run ThomThom’s Cleanup script to reduce triangulated geometry into single coplanar faces.
So how does the plugin work?
With the latest version of SketchUp 8, it's easier than ever to install plugins:
1. Visit STL the project page at https://github.com/SketchUp/sketchup-stl.
2. Click on the link at the top of the page and download the RBZ file to your computer.
3. Open SketchUp. Click Window (Windows) or SketchUp (Mac) > Preferences > Extensions > Install Extension…
4. Browse to the folder that has the RBZ file, select it and click "Open." You will see a warning message that asks if you're *sure* you want to install the plugin. Click "Yes."
So now you’re all set with the STL plugin: you can now export entire SKP files to STL or just specified groups. What about the 3D printer? It turns out that Make magazine released a great issue comparing a broad range of 3D printers so you can find the right one that fits your needs and your budget.
Last but not least, if you're a developer and interested in contributing the SketchUp STL plugin project, feel free to visit the project page to get started. Happy designing and printing!
Posted by Tommy Acierno, SketchUp Team
'건축과 BIM' 카테고리의 다른 글
| Graphisoft introduces BIMx Docs for iPhone and iPad (0) | 2013.11.15 |
|---|---|
| Apple granted patent for multitouch-enabled virtual CAD tools (0) | 2013.08.01 |
| 2011년도 ArchiCAD BIM관련 사업수행실적 우위 기록!(펌) (0) | 2012.09.12 |
| 팔라디온 플랫폼과 Soft Architecture (0) | 2012.08.17 |
| n-Depth: Graphisoft talks to Architosh about ArchiCAD 16 (0) | 2012.08.07 |
